fiber arts
assignment expectations
Assignments are graded on participation, effort, creativity, following instructions, and dedication for neatness.
Participation is graded on independent problem solving, cleaning up, and keeping supplies organized.
Participation is graded on independent problem solving, cleaning up, and keeping supplies organized.
Studio Habits
|
RECOMMEND
- Watch YouTube videos when struggling with a technique or material
- Do not lend out your required materials - Do not take your projects home - You are welcome to bring in fabric or other materials from home |
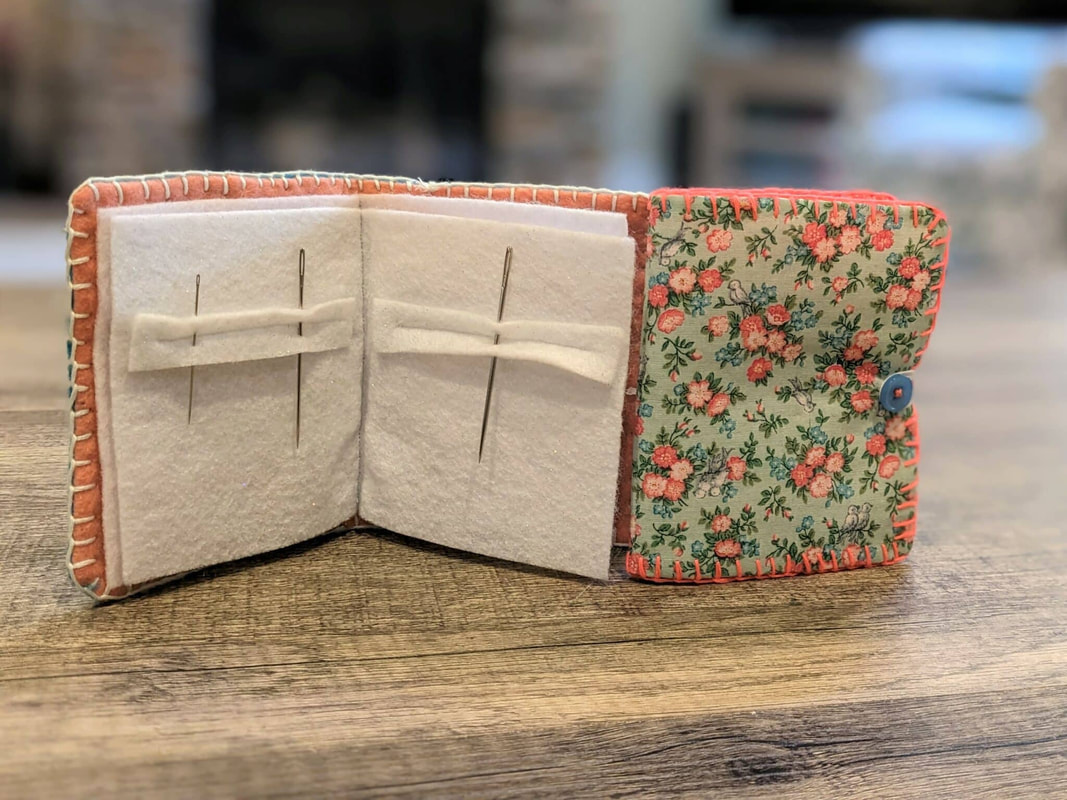
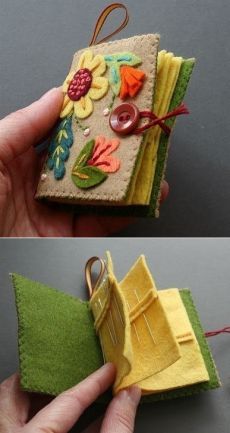
#1. needle holder book - 20 points
Return the needle you use for this project to the bin everyday until your book is finished.
When your book is finished, then you will receive your own needle kit that you will have for the rest of the semester.
When your book is finished, then you will receive your own needle kit that you will have for the rest of the semester.

|

|
|
|
Pick out two pieces of felt fabric from the felt scrap bins.
Cut each piece to 8" x 6". Advice for cutting felt: use the back of the scissors and make short cuts. Draw lines with chalk pastel or pencil to make sure you cut straight edges. Choose a piece of embroidery thread (measure the short length of the table). Thread a needle. DO NOT TIE THE THREAD TO THE NEEDLE.
|
|


|

|

|
Tie a double knot at the end of the thread.
My technique for a juicy knot: tie a first knot but do not pull it tight, tie another knot and line it up on top of the first knot and then pull tight. |


|
Stack the felt pieces together, line up neatly.
Draw a line down the center with a pencil or chalk pastel. Sew the center of the book together. Make sure your knot lands on the inside of the book. Use a "straight stitch" which is just a normal, basic stitch. THROUGHOUT THIS WHOLE SEMESTSER : as you start sewing, if your thread gets tangled - DO NOT PULL TIGHT, gently pull apart to untangle. Keep your stitches consistent in size and spacing. They should be about the length of a grain of rice. End your stitch on the inside of the book so that the end knot is on the inside. My advice for tying off a knot: Place the knot as close to the material as you can. Place your thumb against the knot and pull to keep it tight against the fabric. |


|

|

|
|
Cut the thread and trim the beginning knot tail. Do not cut too close to your knots.
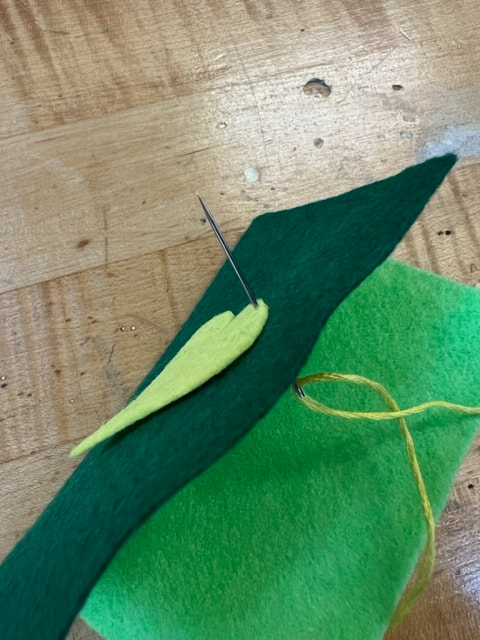
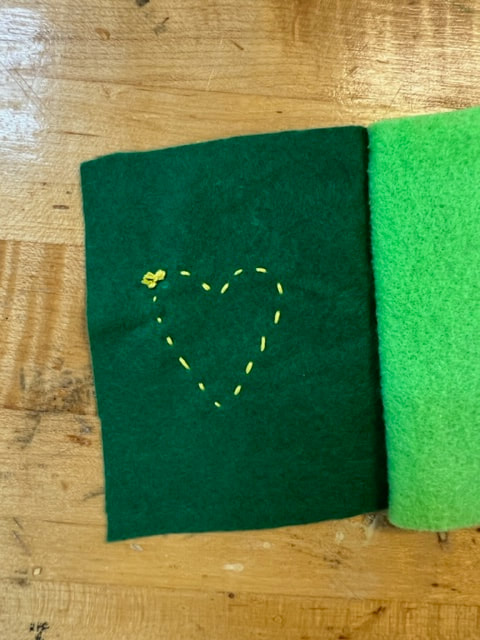
Cut out a little decorative shape from another piece of scrap felt. Place it on the book cover. Using a straight stitch, sew the piece to the cover. Place your knots on the inside cover. Keep your stitches consistent in size and spacing. Do not get too close to the edge of the felt, it will tear. |
|

|
|
#2. Embroidery practice stitches - 20 points
|
14 Basic Embroidery Stitches
https://www.thesprucecrafts.com/stitches-every-embroiderer-should-know-4122123 Make a sample of these 14 stitches in your needle book:
(the video uses two pieces of felt because that is what these stitches are most useful for, just do your sample along the edge of your one sample page)
|
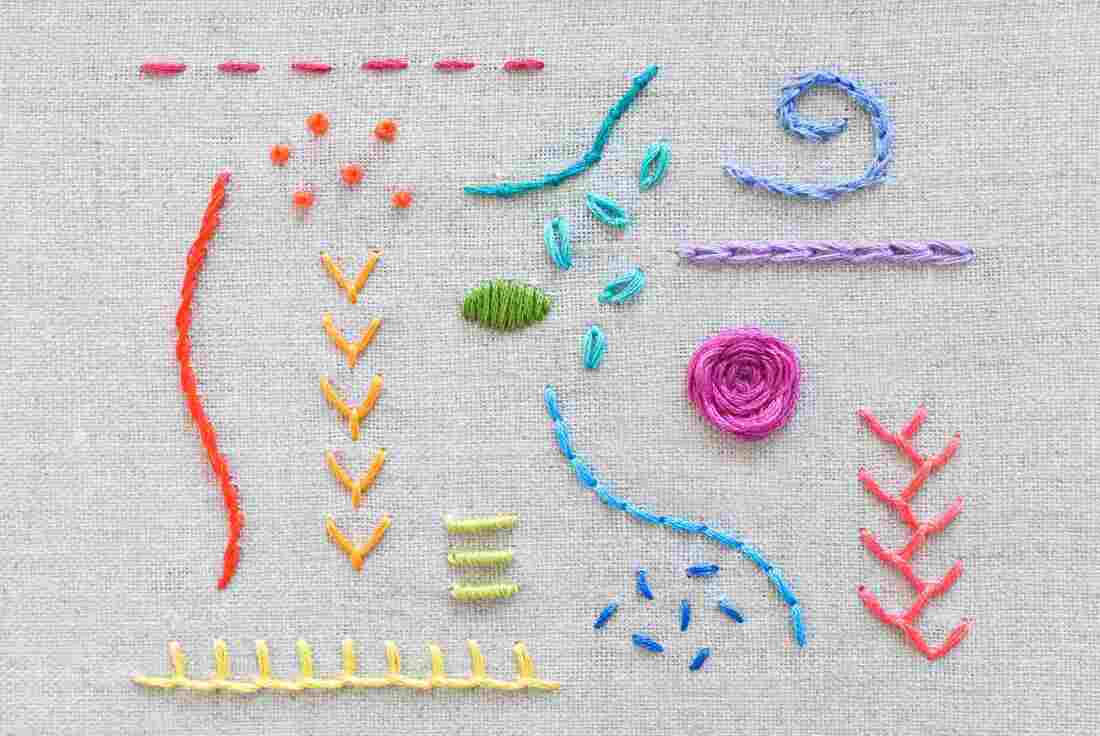
Use embroidery thread.
Your beginning and ending knots should be on the back side of the fabric. Choose different colors for each stitch so that they are easy to tell apart. Watch youtube videos if you are struggling to understand a stitch type. |
#3. embroidery magazine - 30 points
|
|
Choose a magazine page and embellish with embroidery thread. Magazine page should have minimal text. Trim the edge so that it has a clean straight edge. (You do not have to choose an image of a person)
Glue your image to a piece of copy paper to help support the paper from ripping. Show your knowledge of at least 3 stitch types from the sampler exercise. Your embroidery embellishment should aesthetically compliment the image, should be about 30-40% of the composition (slightly less than half the image), but should not obscure the subject matter to the point of completely covering it. Be creative in your design. |
Recommend to start with a practice magazine piece to get used to sewing through that material without ripping it. If your stitches are too close together, you will rip your image.
Your final image should not be ripped, if you rip the paper you will need to start over on a different image. Choose a thin, sharp needle.
Your knots must be on the back side.
Your final image should not be ripped, if you rip the paper you will need to start over on a different image. Choose a thin, sharp needle.
Your knots must be on the back side.
|
Artist Spotlight: Stacey Page Page’s use of embroidery on photographs creates texture and depth, adorning the subjects with creations that embellish their character. “The photographs mostly come from obscure auctions in the backwoods of Georgia which in themselves can be more bizarre than the art itself. The photographs are extinctions or discarded, and I don’t begin by having any relation to them. At the time we are done, I know them by name, which is given. I stare at a photograph for quite some time throughout the process. It is very easy to lose a photograph [by adding too much embroidery]." |
|
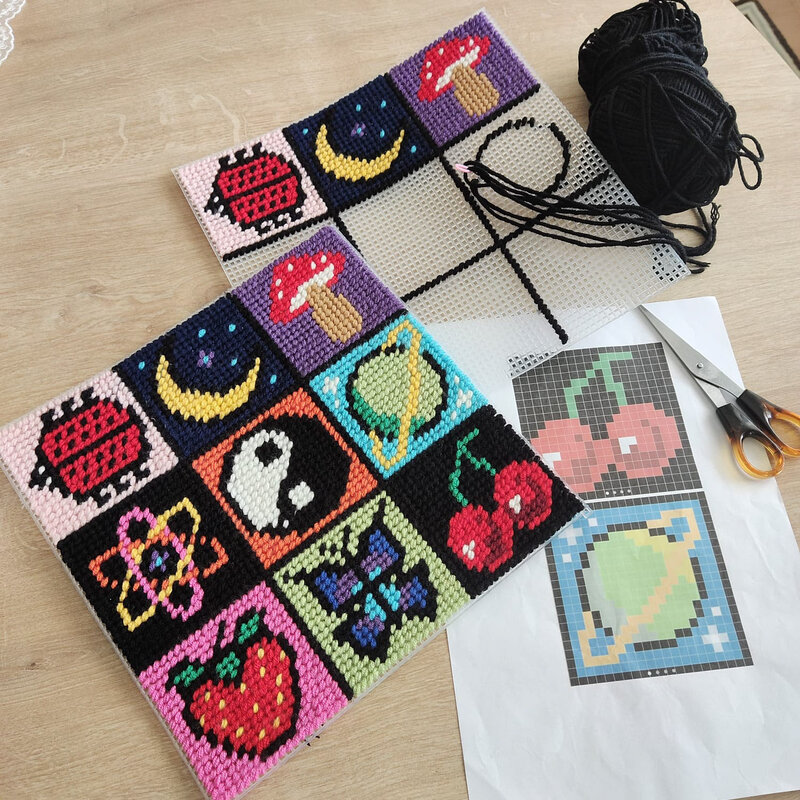
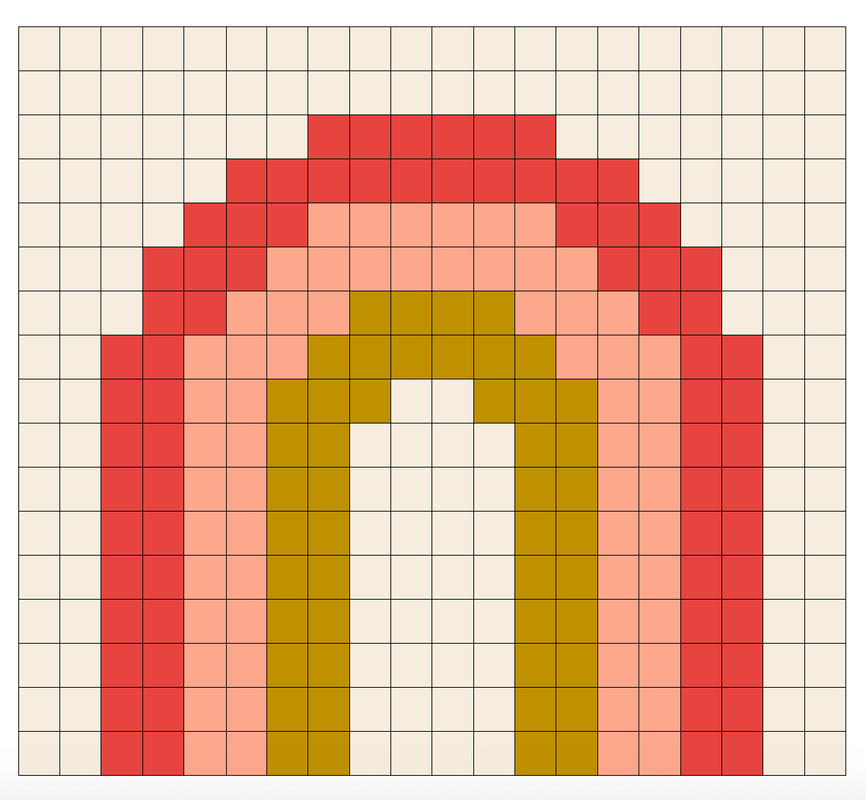
#4. Pixel art Cross stitch - 30 points
|
Cut a piece of plastic sewing canvas about 3" (you may use the premade circles in the plastic sewing canvas bin)
First plan your design, color (with colored pencils) a piece of graphing paper that matches the size of your canvas. Your design should be moderately complex. Must fill entire canvas. Must have three color changes. Designs should be figurative (not abstract). Use yarn and a large eye blunt needle. Stitches should be even, consistent, and smooth (not sticking out and loose or too tight). There should be no canvas visible in the final product. Your knots should be on the back side. Wrap your edges so that no plastic shows in the end. Do this project twice, two different designs. Optional, add a hanging string. 
|
#5. Embroidered brooch pin - 50 points

|

|
|
Phase 1 - Getting the project ready: Start your design on a piece of paper. Your design should be moderately complex with color changes and interesting details. Your design must be figurative. Overall it should be no smaller than 3" and no bigger than 5". You are making yourself a template to follow for the embroidery. You do not need to draw every detail but should make clear lines where colors change, etc. Cut a piece of Embroidery Stabilizer that just fits your design. Take it to the light table and trace your design onto the fabric stabilizer. Use pencil or pen-tip sharpie. |
|
Pick out a background felt piece that fits your project and fits into a chosen embroidery hoop. The felt piece must be larger than the hoop to get good tension.
Optional to iron the felt piece to smooth down the fuzzies and create a more solid structure.
Place the felt into an embroidery hoop. Open the set screw almost all the way before attempting to replace the outer ring. DO NOT OVER TIGHTEN THE SET SCREW!!!! THAT WILL CRACK THE FRAME!!! Fabric should be taught, no creases, and should fit snug. You may need to tighten the screw as the project goes on.

Phase 2 - Sewing
Place your embroidery stabilizer design on the center of the felt fabric. As you begin, the stabilizer piece may want to move around, just be aware of it and try to keep it flat and stable as you go. The more it gets sewn down, the better it will stay in place. You can use a safety pin to help keep it in place at the beginning.
Start embroidering!
Embroidery thread should make up 85% of your design (minimal empty felt background space).
Use your knowledge of stitch types to make intentional and interesting textures.
Optional: incorporate beads or sequins
All knots should be on the back.
When completely finished sewing!...

|

|
Phase 3 - Finishing
Take your felt out of the embroidery hoop. Cut out your design BUT! leave a small edge (~ 1/4") of felt around the design. Whip stitch the edge. You should have no gaps! Whip stitches should be even and consistent. Take your project to the sink and wash away any remaining embroidery stabilizer. This material is water soluble - it melts under water. No need to scrub your design, be gentle, but make sure there is no stabilizer gunk under your embroidery. Let dry overnight. Iron flat if needed. Sew a pin clasp to the back of the pin. Finished! |
#6. sugar skull soft sculpture - 40 points

|
Step 1:
Plan your design. Collect materials (felt shapes, sequins, beads, etc.). Sugar Skulls should be multi-colorful, shiny and fun details. Sugar Skulls are a decoration in celebration of Dia De Los Muertos, a time to celebrate the ones we love who are no longer with us, they are not scary Halloween skulls. Make a paper template of the skull shape. Should be at least 6"-8" tall. Trace the template on two pieces of felt for the front and back skull shape. Cut out. You may create your own felt shapes but the edges should be cut nicely. Tip: the back of the scissors are the sharpest Step 2: Sew all the decorations onto the front piece. Layer felt shapes and choose bright, contrasting embroidery thread for the best aesthetic. Choose decorative and a variety of stitch types. Add decorative detail with embroidery. Step 3: When all surface decoration is finished... Use the Blanket stitch to put the front and back pieces together. DO NOT SEW ALL THE WAY SHUT! Leave a small gap (two fingers width) for stuffing. Stuff until the shape is filled out. It should still be plushy but not overfilled (not stretching the blanket stitch from so much stuffing material). Then finish stitch. All knots should be on the inside of the sculpture, your very last finishing knot on the blanket stitch is the only exception. Optional: Sew a ribbon or yarn for hanging (before front and back pieces are sewn together) |

|

|

|

|
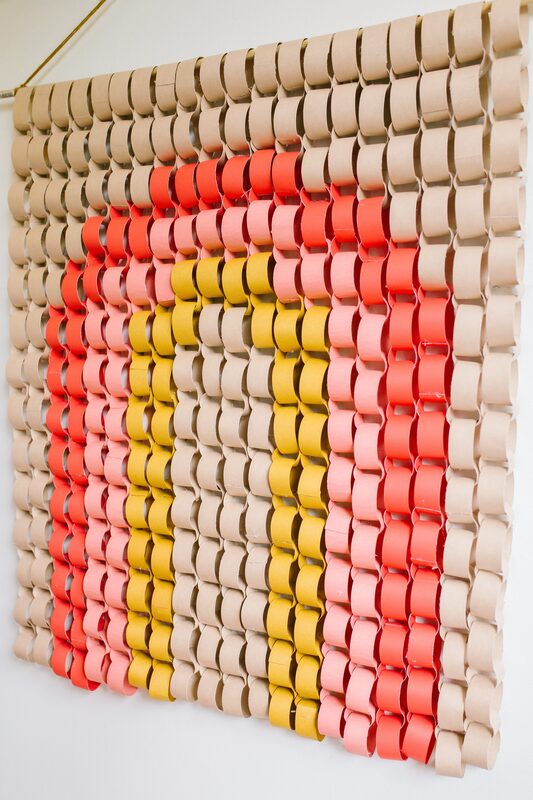
#7. Paper chain wall hanging - 40 points
|
Plan a design on graphing paper first.
Design can be figurative or abstract, but should be interesting and creative and have at least 3 colors. Project will hang off a wire clothes hanger. Design should fill the width of the hanger and should be at least 20" long. Cut construction paper strips. No more than 2" wide. Create practice paper chains to get familiar with sizes and how your design will work. |
|
|
Option:
You can either join your chains with pieces that are all the same size (like in the blue and white example) - this way will have more visual space between the pieces
Or you can join the pieces together with smaller loops so that the pieces are closer together (like in the orange fruit example)
Use a glue stick. Use the paper cutter.
#8. Loom Weaving - coasters - 60 points

|

|
|
Plan a design for four coasters. The coasters should be different from each other, but aesthetically go together as a set.
Think if everyone's coasters in class got mixed up, we should be able to easily put together which coasters go together because they are similar in design theme or color scheme. Create your warp on the loom by looping a string through the loom teeth. Use the white string from the tiger closet. Tape the beginning and the end of the warp on the back of the loom. Be gentle on the teeth of the loom, they break easily. The warp should be taught. Cut a piece of yarn about the length of the long edge of the table. Use a large plastic sewing needle. Thread yarn on needle. Go over-under through the warp. Leave a tail hanging out at the start and end of the yarn (we will trim these at the end). 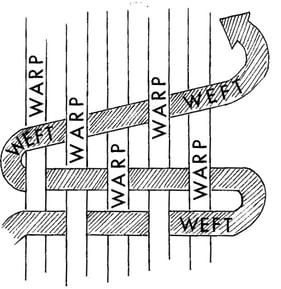
|

As you build weft layers, pull the weave downwards to tighten.
You can use a popsicle stick (in the needle bin) to help do this, weave the popsicle stick through the warp and pull downwards. There should be mostly no warp visible within your weave. 
|

|
Weave about the size of a square. To take your coaster off the loom, cut the warp strings in the center on the back of the loom. Gently pull the warp off the loom, be careful not to break teeth. If your coaster becomes loose in this process, you can gently pull it back together, but don't worry we will tighten it in the next step. The tutorial shows to tuck the yarn weft tails in but I would tie off the warp ends first. This method is called "Damascus Edge" which is a popular edge for finishing woven rugs. Follow the tutorial for how to secure tie off the warp ends. 
|

Trim the warp ends to your preferred length.
After finishing both warp ends on the top and bottom, then return to the instructions for tucking yarn weft tails. The tails ends should not be visible in the final product. Make four coasters. 
|
EXTRA crafts & RESOURCES:
- Artist Bisa Butler, video 1, video 2
- Artist Gabriel Dawe, video 1, video 2
- Embroidery on Converse Shoes
- Artist Sheila Hicks, video 1, video 2
- Coffee Cup Cozy
- Fabric Scrap Mushrooms
- How to Crochet for Beginners
