Step 1: Carefully cut along paper bag seams
Step 2: Cut approx 3 1/2 inches off the top to get a flat rectangle ~ 14x20"
Step 3: Fold in half
Step 4: Glue the two pieces of 9x12, leaving space all around each piece and leave a little space in between them to allow the book to bend properly.
Step 5: Cut the paper bag on top and bottom in the middle just a small amount. Fold over paper bag edges onto the white paper and glue down.
Step 6: Make a dot at these points: 1 inch, 2”, 4”, 6”, 8”, 10”, 11” down the center of the book.
Step 7: Carefully fold 12x18 pieces in half ONE BY ONE.
Step 8: Repeat the dots on the fold line of each piece. BE CONSISTENT!
Step 9: Using the needle, carefully poke a hole in each dot, ONE BY ONE! Don’t forget to also do the paper bag. Place the folios inside each other to stack the pages of your sketchbook. Line it up with your book cover.
Step 10: Cut a piece of thread that is three lengths of the length of your book ~ 42"
Step 11: Tie a juicy knot on one end of the string, leave a ~3" tail near the needle.
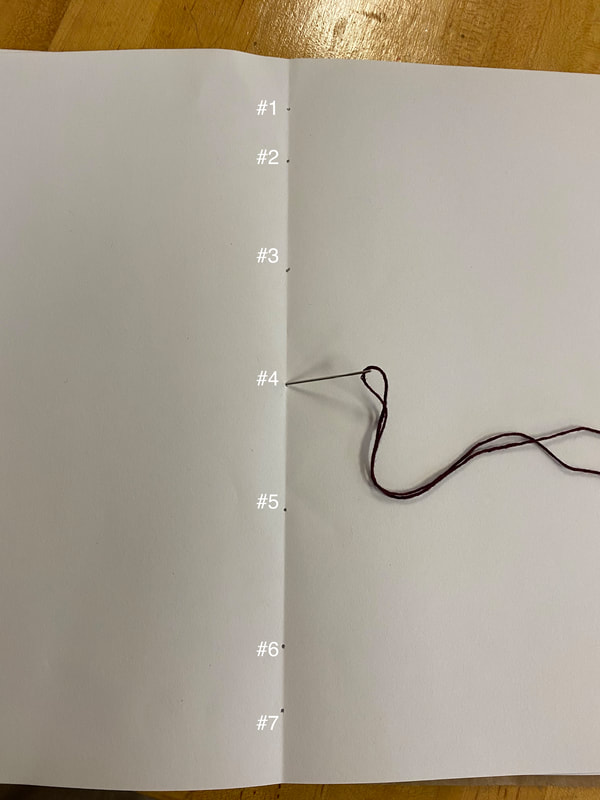
SEWING INSTRUCTIONS
Step 12: Start on the INSIDE of the book, go through the middle hole #4.
At the start, be careful to go through each page slowly. You do not want to accidentally miss a page.
Step 13: Now you are on the outside of the book, go back in through the hole above (#3)
Step 14: You are now on the inside of the book again. Go through the hole above that #2
Step 15: Go through hole #1
Step 16: Go through hole #2 again
Step 17: Go through hole #3
Step 18: Go through hole #4 again, be careful do not push the needle through your knot
Step 19: Go through hole #5
Step 20: Go through hole #6
Step 21: Go through hole #7
Step 22: You are on the inside of the book, go back through hole #6
Step 23: Go through hole #5. You’re done!
Step 24: Tie a good knot
Due Thursday, September 2nd
Step 2: Cut approx 3 1/2 inches off the top to get a flat rectangle ~ 14x20"
Step 3: Fold in half
Step 4: Glue the two pieces of 9x12, leaving space all around each piece and leave a little space in between them to allow the book to bend properly.
Step 5: Cut the paper bag on top and bottom in the middle just a small amount. Fold over paper bag edges onto the white paper and glue down.
Step 6: Make a dot at these points: 1 inch, 2”, 4”, 6”, 8”, 10”, 11” down the center of the book.
Step 7: Carefully fold 12x18 pieces in half ONE BY ONE.
Step 8: Repeat the dots on the fold line of each piece. BE CONSISTENT!
Step 9: Using the needle, carefully poke a hole in each dot, ONE BY ONE! Don’t forget to also do the paper bag. Place the folios inside each other to stack the pages of your sketchbook. Line it up with your book cover.
Step 10: Cut a piece of thread that is three lengths of the length of your book ~ 42"
Step 11: Tie a juicy knot on one end of the string, leave a ~3" tail near the needle.
SEWING INSTRUCTIONS
Step 12: Start on the INSIDE of the book, go through the middle hole #4.
At the start, be careful to go through each page slowly. You do not want to accidentally miss a page.
Step 13: Now you are on the outside of the book, go back in through the hole above (#3)
Step 14: You are now on the inside of the book again. Go through the hole above that #2
Step 15: Go through hole #1
Step 16: Go through hole #2 again
Step 17: Go through hole #3
Step 18: Go through hole #4 again, be careful do not push the needle through your knot
Step 19: Go through hole #5
Step 20: Go through hole #6
Step 21: Go through hole #7
Step 22: You are on the inside of the book, go back through hole #6
Step 23: Go through hole #5. You’re done!
Step 24: Tie a good knot
Due Thursday, September 2nd
Sketchbook
While waiting on your cover, work on folding sketchbook pages.
Fold 15 pieces of 9x12" (hamburger), hole punch Chipboard for the back cover? Must include 5 folios of "other" paper type: EX: construction paper, newspaper, collage paper, tissue paper
|
Go to www.pixlr.com
Save as PNG, email to me Make a sketchbook cover design - must incorporate your name or initials 
|

UNIT A
Practice Project.A1: Sketchbook Title Page Design
|
Decorate the Title Page (first inside page) of your sketchbook.
You must have your name in the design, make it easy to read and stand out. Fill canvas. Be creative. Use any media. Cover ideas: Zentangle, Collage, Quote, Patterns, Magazine collage, Characters, Flowers, use your Imagination! 20 points
|

|


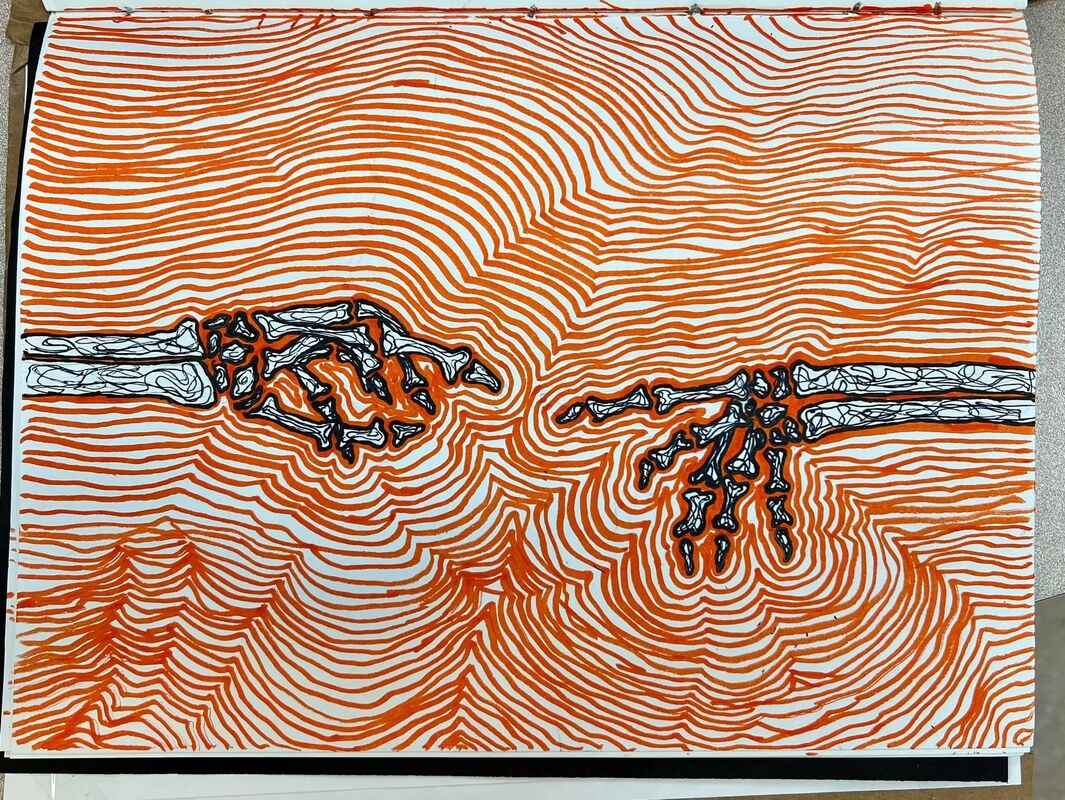
PP.A2: Scribble Art
|
Find an image in a magazine or print one from online.
Using the light table, LIGHTLY trace the contour in pencil. Using pen or sharpie, create the figure in "scribble" lines. Do NOT outline your entire shape in ink. Use line variety, weight, density, and direction to make the figure legible. Your artwork should show at least two of these: Line variety = shape of the line, ex: zig zags, wavy Line weight = line thickness Density = how close together the lines are Direction = the angle of the lines Find the balance between figurative and abstract. Erase the pencil tracing lines. Complete this THREE times with three different images. At least one image must be a person. Choose images that have detailed contour. A simple circle is not challenging enough. Avoid simply drawing the outside contour shape. Each image should fill at least half page. 25 points
|
|

PP.A3: Botanical Imaginative Drawing
|
Find a real leaf or piece of plant.
Glue (use hot glue if needed) it into your sketchbook and transform it into part of an imaginative drawing. Must be figurative, detailed, and creative. May start in pencil, but must finish in colored pencil or marker. 20 points |
|
PP.A4: Art Careers
|
Choose THREE different VISUAL art careers - choose a VISUAL ARTS career.
This website covers careers in all the Arts. Not visual arts: music, theater, culinary, journalism/author, Make sure to write down which three art careers you chose. In your sketchbook. 30 points |
Answer these questions for EACH career -->
1. What are the typical or required degrees and/or experience needed for the career? 2. What skills (talent, business, personality, etc.) do you think it takes to be successful in this career? 3. What do you find interesting or exciting about this career? 
|
PP.A5: Pencil Study and Value Scale
|
Materials
4H, 2H, HB, 2B, 4B, 6B, Ebony/8B Tortillon Toilet Paper Eraser 1. Pencil Study
Make an example of 8 pencils (5H - 6B). Each example should go from using the pencil light to pressing firm. Use 6B or Ebony to make two studies for shading tools Tortillon and toilet paper. (NOT KLEENEX!) Do another tortillon and tissue study with 2H. |

NEVER SHADE WITH YOUR FINGER
Get out of that habit! In Sketchbook
20 points |
2. Value Scale
SIX steps that show clear value steps from lightest to darkest.
The lightest box should still have value, not blank/pure paper.
You may use any pencils and shading tools to accomplish your scale.
SIX steps that show clear value steps from lightest to darkest.
The lightest box should still have value, not blank/pure paper.
You may use any pencils and shading tools to accomplish your scale.
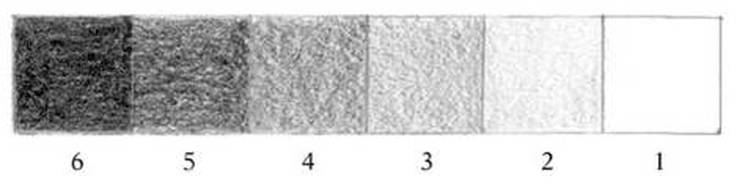
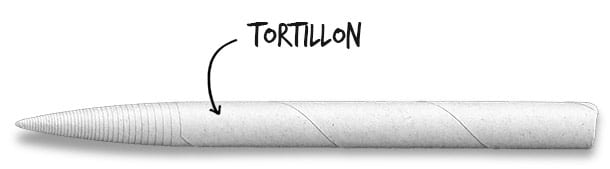
BE NICE TO TORTILLONS!!!
Do not push directly down on the point. They are meant to be used gently on their SIDES. If you want nice tools, treat them right! |

|
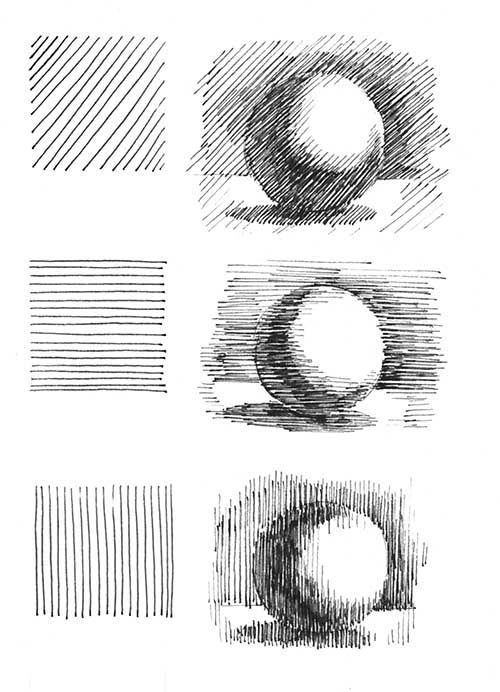
PP.A6: Graphite Sphere
|
Materials
Something to trace a circle Drawing pencils Shading tools Eraser Trace a circle and use your knowledge of the shading tools to create a realistic sphere. Follow the example. Include cast shadow. Accomplish a smooth texture using toilet paper and tortillon. My advice: Fill the sphere with a medium value very softly first, then push your dark areas darker and gently erase your highlights back. There should be no harsh lines inside in the sphere. The contour edge of the sphere should be sharp and clear. The edge of the cast shadow should be soft and fuzzy. In Sketchbook 15 points |
Pay close attention to the value scale within the sphere and shadow.
Where is the darkest value happening? Where is the lightest value happening? 
Before you say you're finished, check your drawing for these common beginner mistakes:
- No value inside the sphere should be darker than the shadow area directly under the sphere. - The true highlight on the sphere should be the brightest area - Do not scribble and push down hard with H type pencils, you will be able to achieve a smooth texture if the paper is dented. |
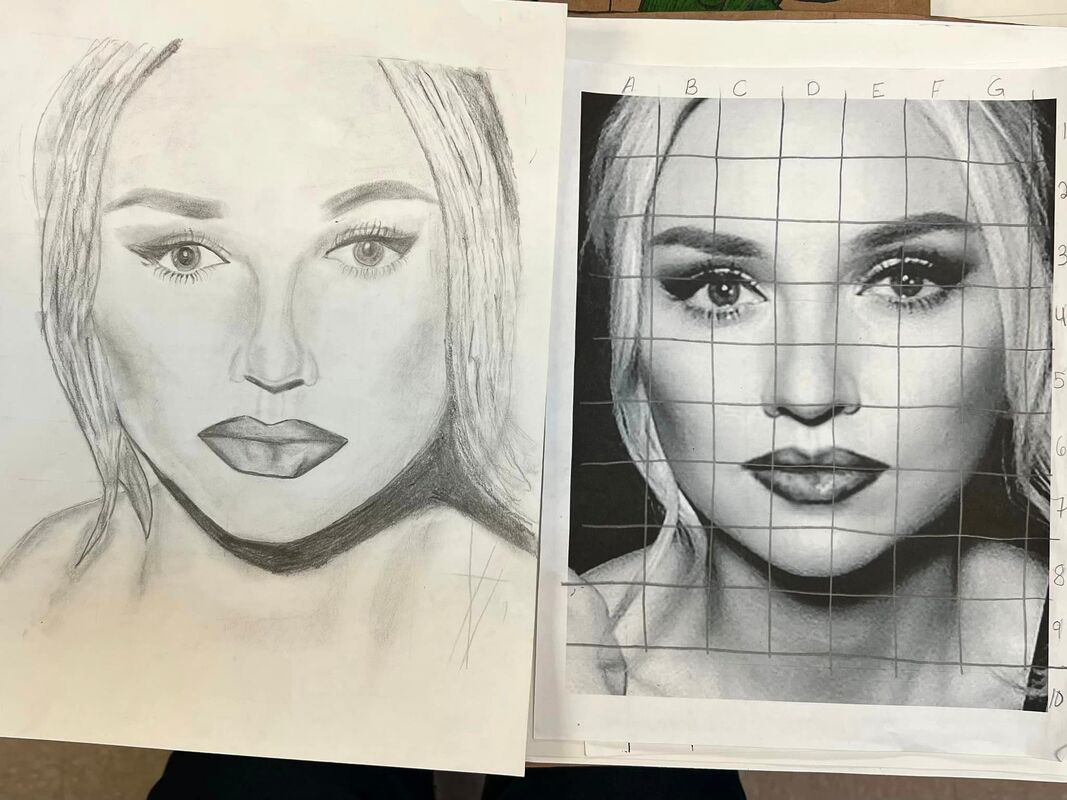
Major Project.A1: Pixellated Portrait
|
Choose a portrait online or a photo of your own.
Turn into black and white. Crop so that the photo is close to the face. You must start with a normal photograph portrait. May not start with an already pixelated image or a painting. Use a website or app to pixelate the image. Find a balance between figurative and abstract. Print the pixelated photo as large as you on the printer paper. Use the light table. LIGHTLY!!!!! trace the grid on a 9x12" paper with a ruler and pencil. VERY LIGHTLY!!!! Do not push down with the pencil. It is important that your grid is the exact size of your photo's pixel grid. It's okay if you have extra space around the edges. Pay attention to the overall value scale of your artwork. 50 points |
Art I use graphite pencils
Art II and up may use acrylic paint Use your knowledge of a value scale, identify the darkest pixels and the areas that are pure paper white. If using graphite, be careful not to smear the graphite as you go. Erase the traced pencil grid in the lightest pixel areas. |


|
TOO PIXELATED : 
|
NOT PIXELATED ENOUGH: 
|
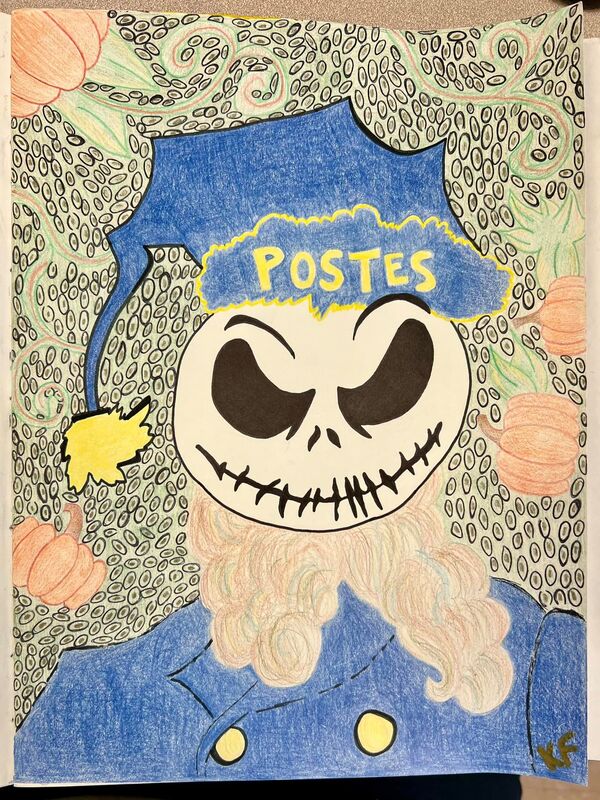
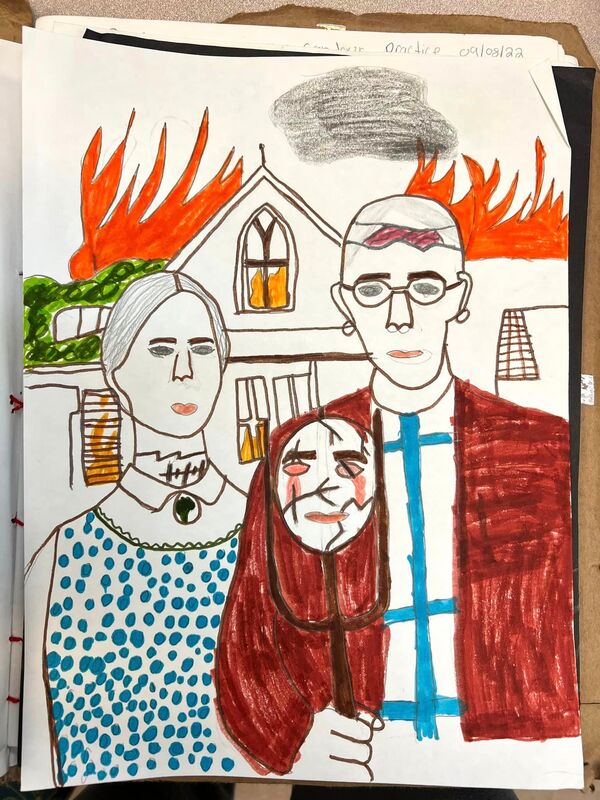
PP.A7: Halloween-ified Famous Art History
|
Choose a famous artwork from https://artsandculture.google.com/explore
or https://www.1st-art-gallery.com/most-popular-paintings.html (Have maturity, these are public websites that show works from throughout art history) As you are scrolling through, do you recognize any of these halloween-ivied examples?! "Halloween-ify" the image. Don't change the original image so much that we can't recognize the reference. The image you turn in must be school appropriate. Complete in your sketchbook. 20 points |

|
|
|
|
Remember...

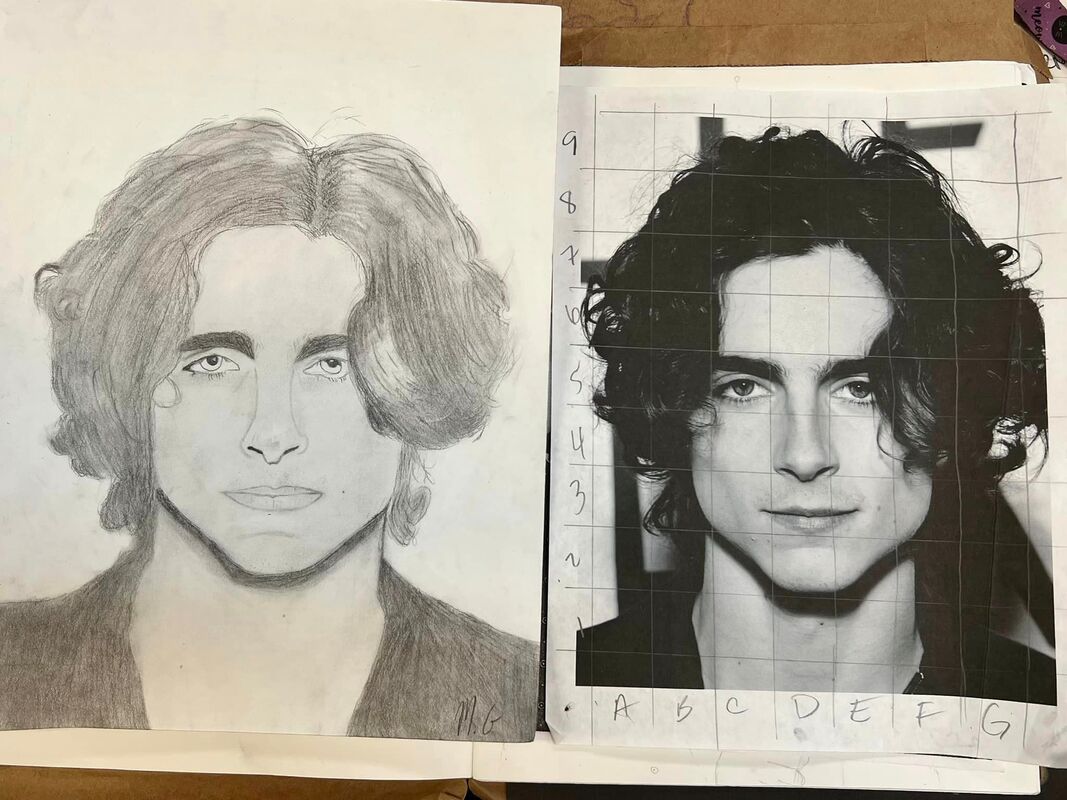
MP.A2: Half or Full Portrait Drawing

|
Art "I" students half portrait
Art II and above students, full portrait 9x12" paper Find a portrait online or choose a photograph that you took. Print your portrait as large as you can. Must be a person, not an animal. Choose a photograph, not a drawing. Choose a photograph that has good lighting and detail. Crop close to the face. You may need to play with the contrast and brightness settings for the image to print the best quality for the project. Ignore details in the background. Use the grid method if you need. (Grid instructions below) There should be a FULL range of value (1 - 6) in your artwork. Pay attention to where the brightest value should be. NOTE: teeth and eyes usually are not actually paper white, they are usually in shadow from the eye lids and lips. True highlights usually land on the tip of the nose, forehead, and lips. DO NOT outline where there is no true line, only shading. (THE NOSE!) Shading texture should be very soft on the face. You should be using multiple pencil types and shading tools to achieve a successful range of value. Work in layers like the video talks about. This project should take time to do correctly and to shade realistically. I like to begin a portrait by very lightly sketching an overall outline, not worried about small detail and then putting in a VERY soft overall base value by making a pool of graphite on scrap paper and applying the value with tissue. 
|
|
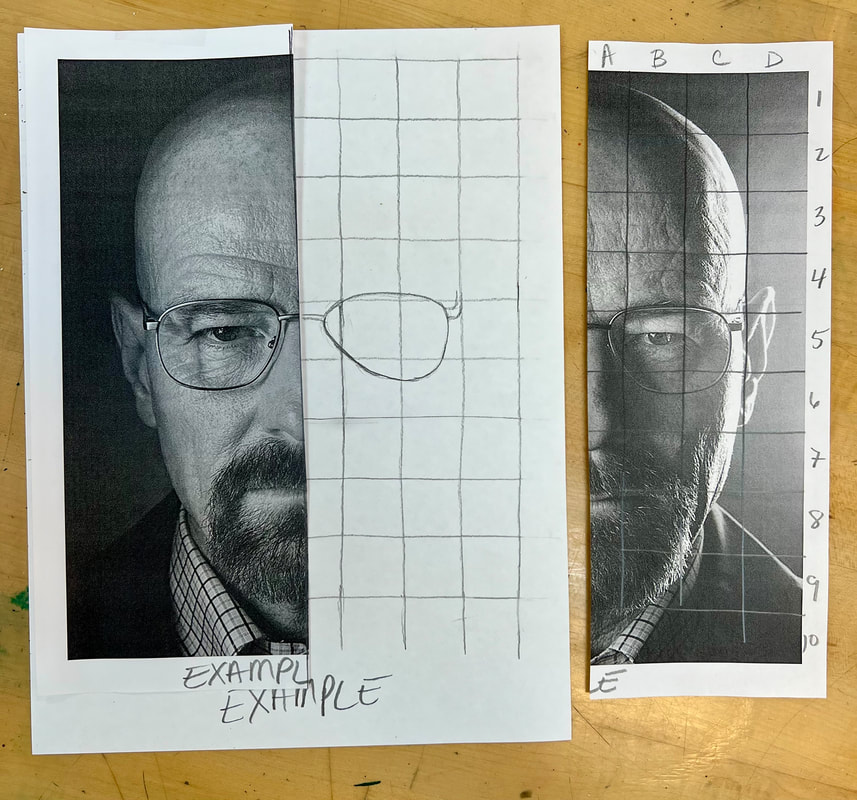
Steps to Use the Grid
(Half portraits: Fold your image down the center and tape it to the drawing paper. Half portraits only need to trace grid on half of the drawing paper) Grid template located in sub folder. Older students, help new students.
|
